Have you ever wanted to take pictures of a pretty night scene? Here is a step-by-step tutorial on how to take gorgeous night pictures, including how to use manual mode to adjust your settings for any dark situation with tons of examples!
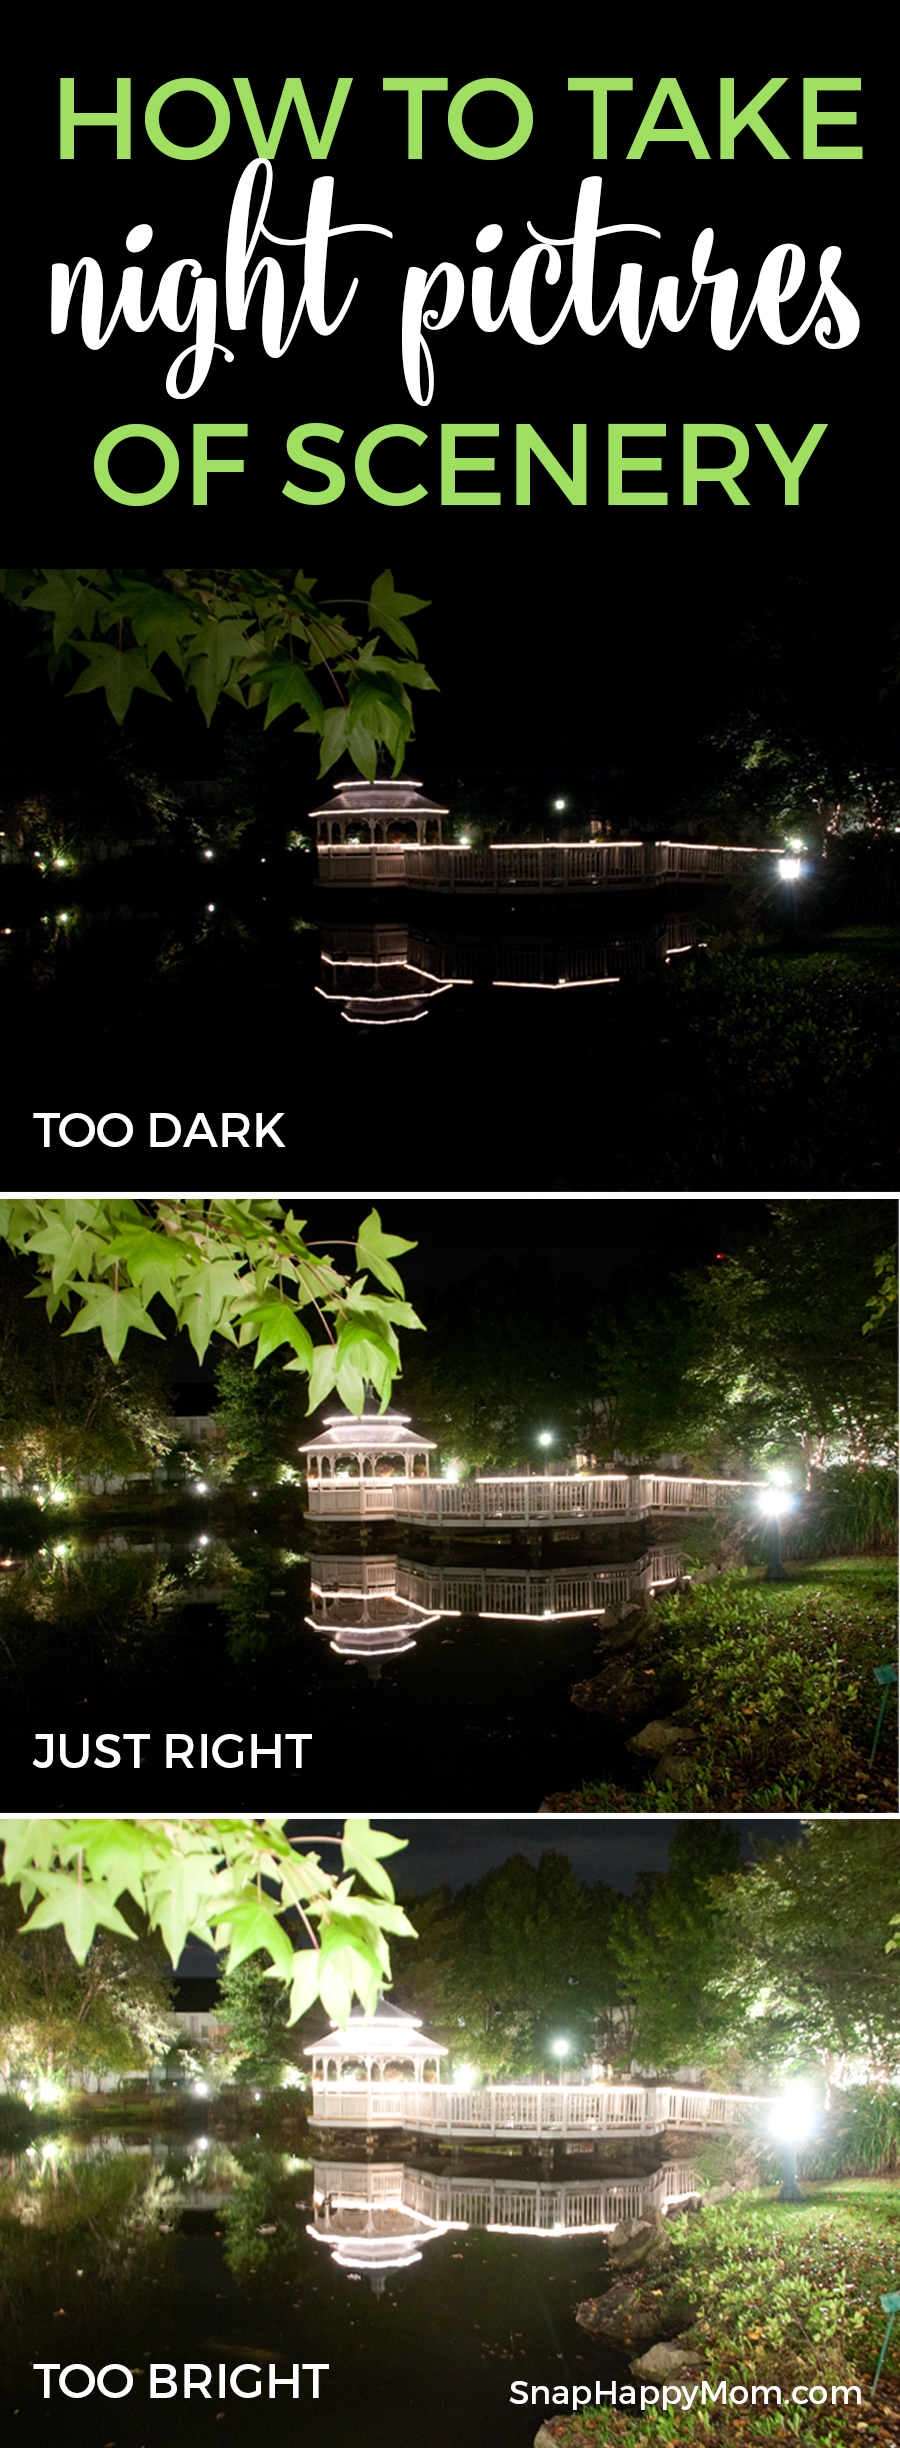
HOW TO TAKE NIGHT PICTURES OF SCENERY
Manual Mode Settings for Beginners
Taking photos in manual mode only requires four simple steps. Manual mode is not as hard as it sounds, and I'm going to walk you through every step. So change adjust the dial to M for Manual mode, and start adjusting those settings!
I would start at these manual settings:
ISO 2000, Aperture f/9, Shutter speed 1 second
1. First, you're going to want to crank your ISO up, close to the end of its range. Mine was set at ISO 2000 which is the highest I like it to go. There is certainly grain, but I'm ok with it up to that point. Raising this ISO number is making your camera more sensitive to the light that's available.
2. Then, you want to stop down your aperture, which means you make the circular opening smaller so that you can have all that beautiful scenery in focus. This means the f-number is actually bigger, f/9 or maybe f/11, because aperture is defined in terms of a ratio. You don't have to understand that completely to take night scenery pictures, just start turning the aperture dial to a high-ish number. I'll show you what worked for me in a minute.
3. Next, you're going to set your shutter speed to about a second. Most of the time this means turning the dial down from 1/125, past 1/60, and past 1/10 to where the numbers start being counted in seconds (as opposed to fractions of a second). I started at 1 second, but it will depend on the ambient lighting.
You need a tripod.
You're going to need a tripod to handle this slow of shutter speeds; just holding the camera in your hands is NOT an option. Your shutter is going to be open a long time, likely several seconds, and any movement from you will result in a blurry picture. This is the tripod I usually recommend for beginners; I've found that you definitely get what you pay for in the tripod department, but you can get started with one under $30 if you need to.
I fully recommend a tripod, but I actually didn't have one when I took these, because I was just walking back to my hotel at night when I saw this pretty scene. (What, you don't carry a tripod around at 1 AM either?)
So, if you're stuck without your gear, you can set up your camera on something like a lawn chair, ledge, rail, etc, or possibly brace your camera against a light post if you can keep completely still. It's just tricky to find the right angle and height you need, so a tripod is definitely easier to work with.
In addition, you probably want to turn on your self-timer. This just puts a delay in between when you press the button and when the camera actually takes the picture. This is kind of optional, but you're probably going to be a lot happier with the pictures, because even pushing the button jiggles the camera the tiniest bit, and these long exposures will show that.
Getting Started
Ok! Your camera is all set up! (It won't take this long to figure it out next time, I promise.)
Now, choose your angle and point your camera in the right direction. It may be tricky to see through your viewfinder, but this is going to be a trial and error process anyway, so you'll figure it out. Take one picture, observe in your viewfinder, and then fiddle with the settings.
The settings I gave you might now work for your situation. It all depends on how much ambient lighting there is around.
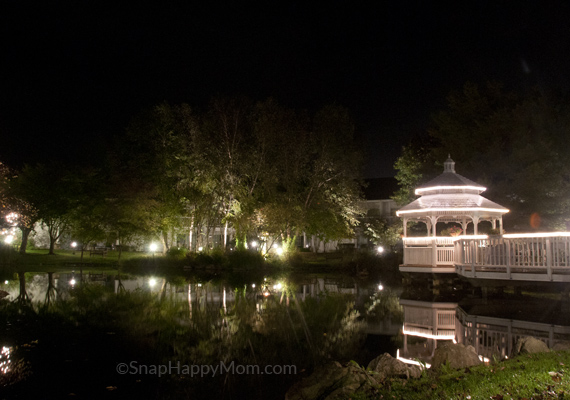
This gazebo was lit up and there were streetlight posts every 10 feet or so. The great thing about manual mode is YOU get to decide what you want this to look like, based on the unique situation you are in!
So, take one picture, then look at it on the screen on the back of your camera.
Troubleshooting Your Pictures
When you're taking night pictures of scenery, you're likely to have one of two issues:
Too bright?
You need less light. The way to change this for landscape night pictures is to 1) make the aperture smaller by raising the f/stop number or 2) make the shutter speed shorter. Technically you can also adjust the ISO, but if you're using a tripod anyway for long exposures, then it's easier to balance out aperture and shutter speed.
Too dark?
You need more light. The way to change this is to make the shutter speed longer. (Technically, you could also make the aperture larger by lowering the f/stop number, but you don't want to rely on this with scenery because you want everything to be crisp and in focus. Larger apertures mean more goes out of focus, and you don't want that right now. Just stick to changing your shutter speed.)
Additional Help with Manual Mode
If you're struggling with what settings make a picture brighter and which ones make it darker, then I have a free printable below that should help! I made this simple exposure chart to help you understand how aperture, shutter speed, and ISO work together. It can be hard to understand exposure at first, but this chart will help!
Download this free, one-page printable that you can easily refer to as you play around with night pictures and changing specific settings. Most of the example numbers on the chart are for daytime pictures, but the principles will definitely help.
NEWSLETTER SUBSCRIPTION
+ FREE PRINTABLE EXPOSURE CHART BONUS
Sign up for my newsletter below to get your Exposure Chart!
By entering your email below, you'll be signed up to get 1-2 weekly "snap happy" emails from me, with photography tips and mom-life hacks. When you confirm your subscription, you'll get a bonus exposure chart pdf to help you with night photography.
Download your Exposure Chart by entering your email here:
THREE EXAMPLES OF NIGHT PHOTOGRAPHY SETTINGS
Here are some examples to walk you through how to adjust your manual settings for night photography. I took these photos in the middle of the night I was walking through this beautiful courtyard area and wanted to capture the pretty lights reflecting in the lake!
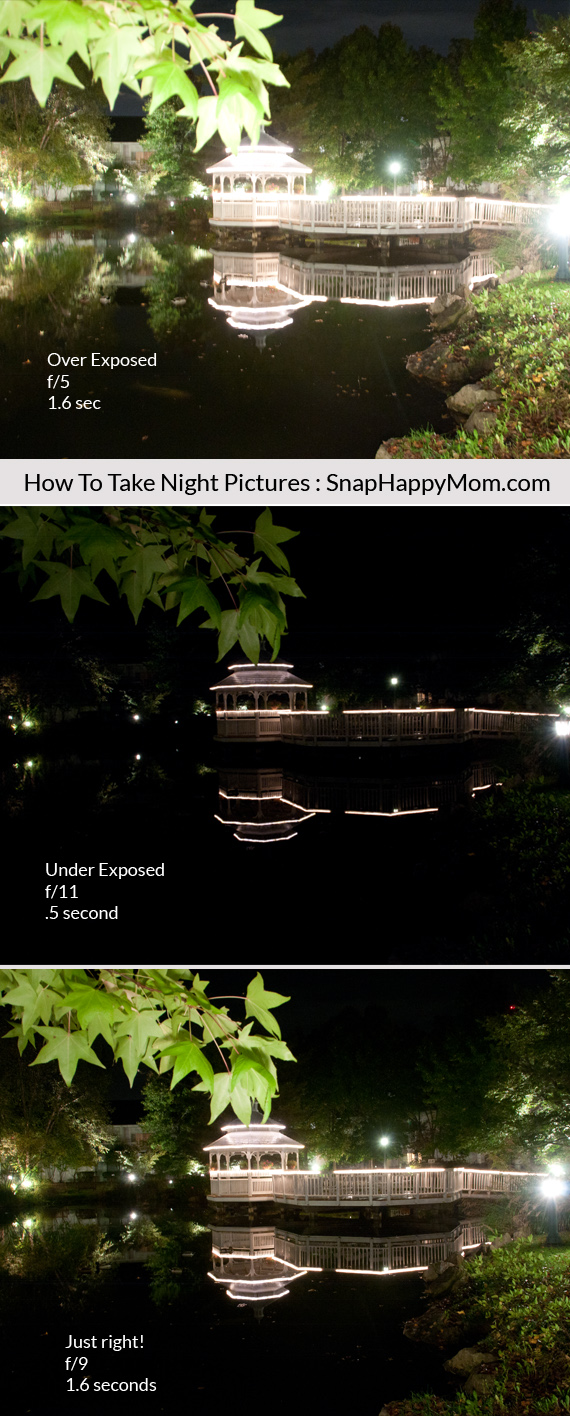
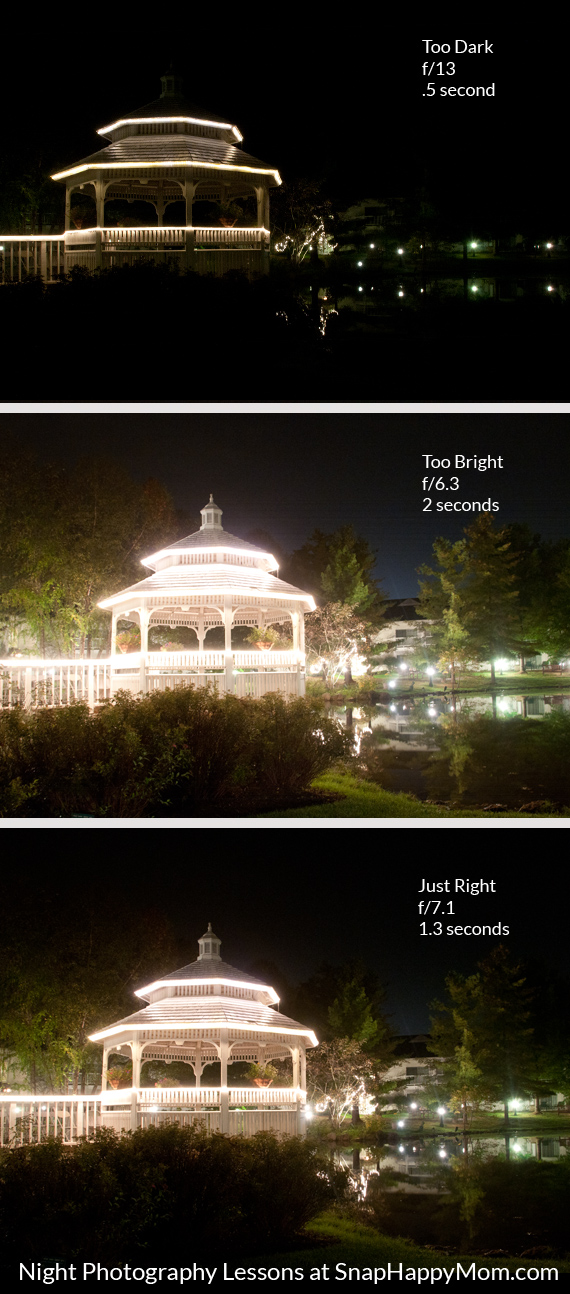
1. Playing with Shutter Speed and Aperture To Get the Right Exposure
This was one of the first shots I took. It's not beautifully composed, but I just wanted to see how things were looking before I hiked around the lake for the perfect angle.
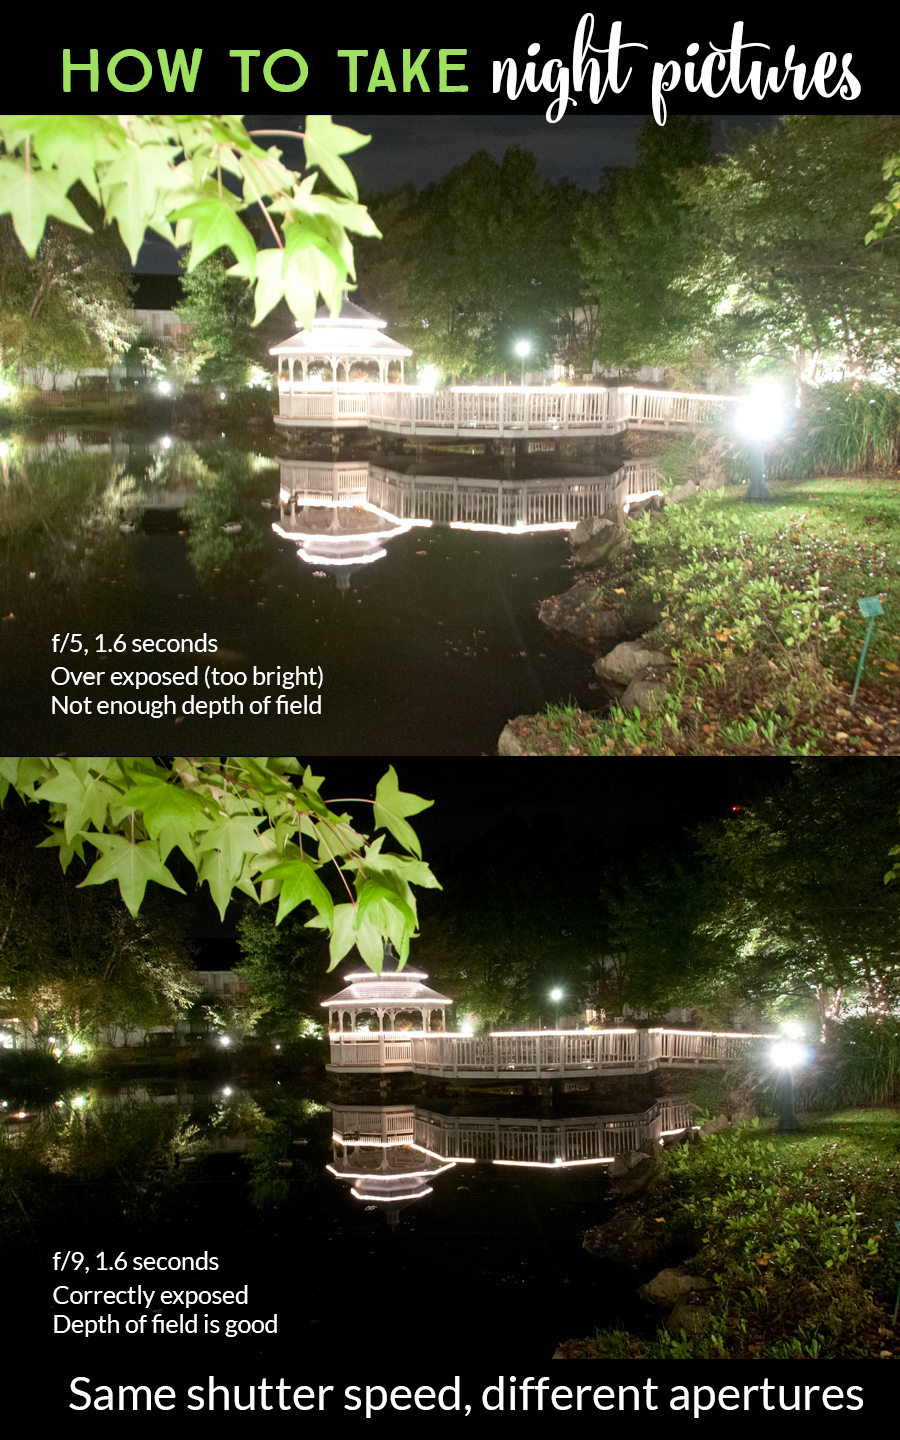
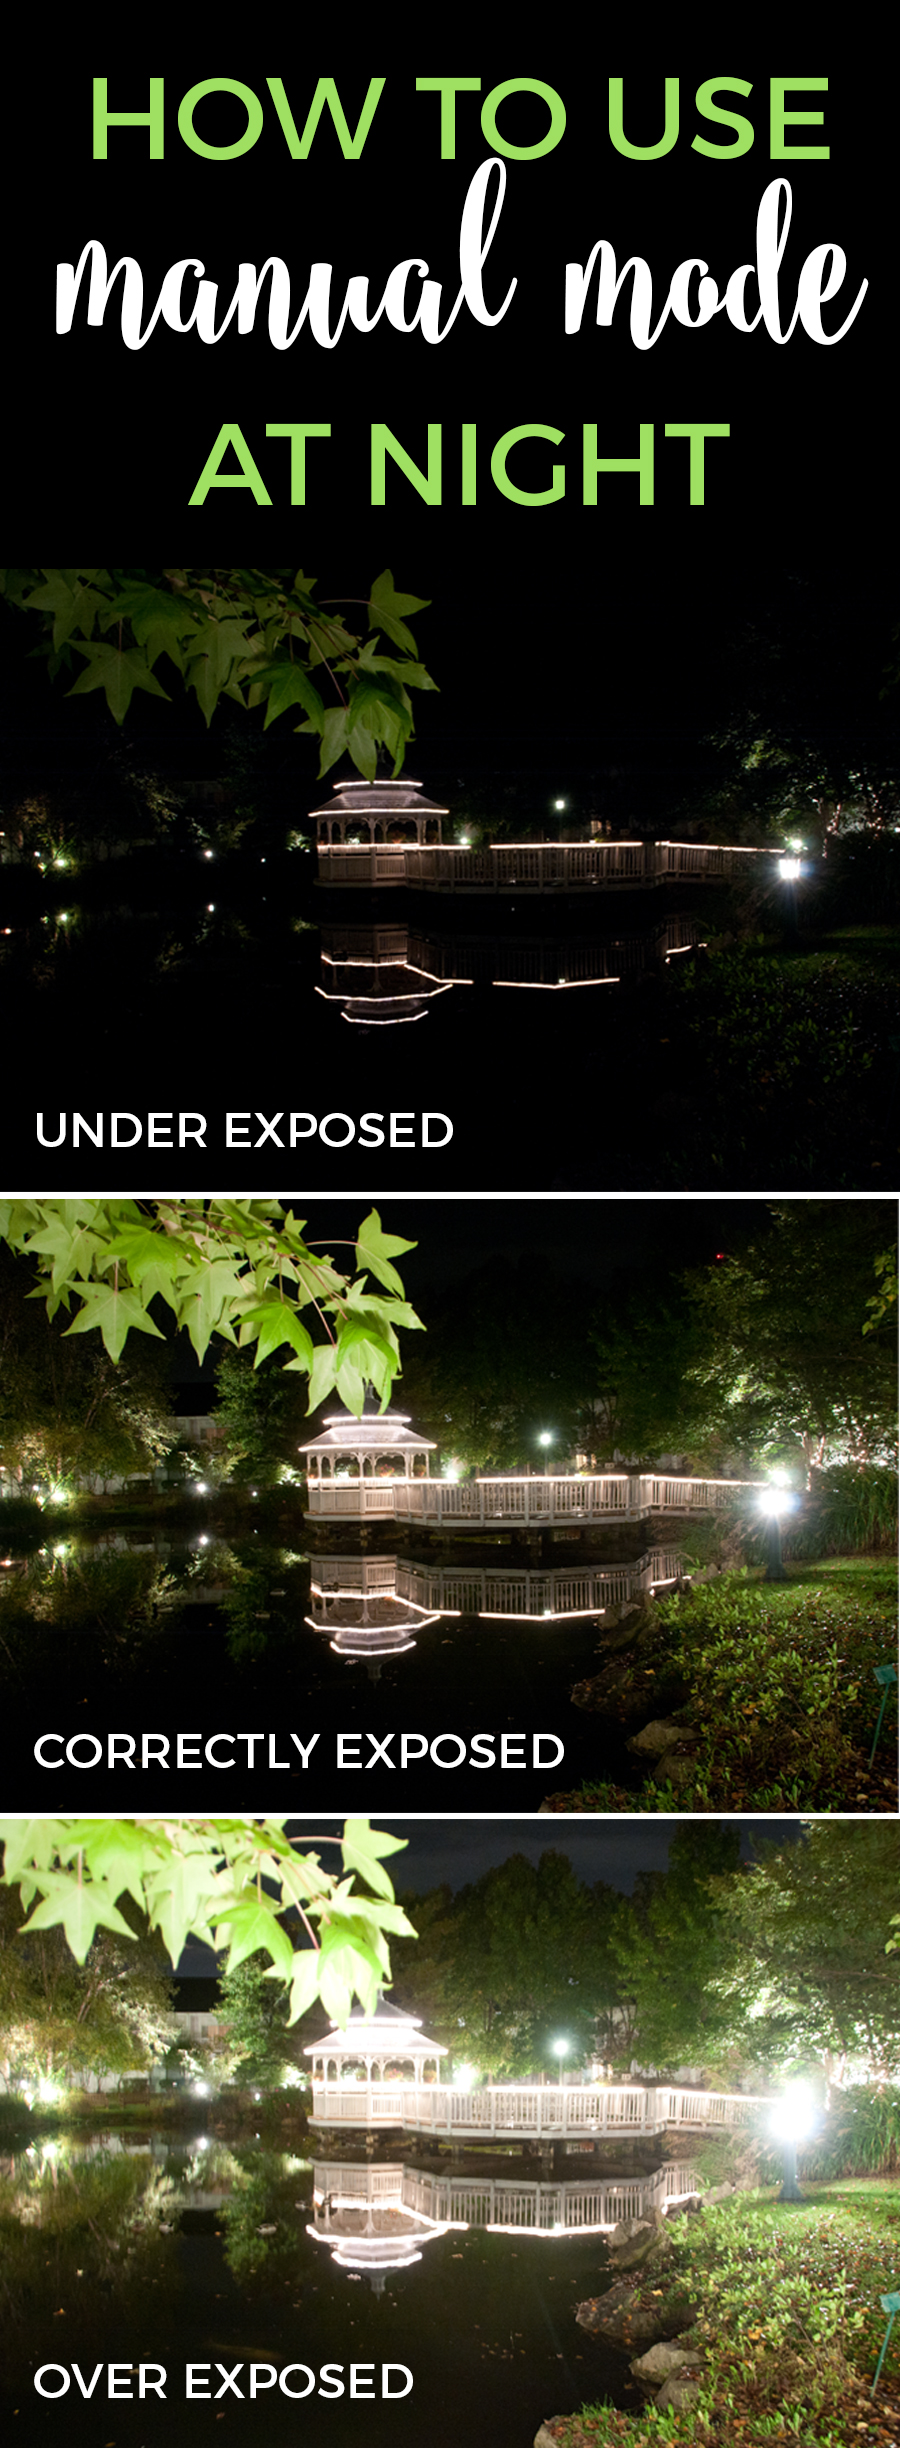
The top image was my first test shot. See how the gazebo is completely white? Gazebos should not glow: this is over-exposed. My aperture was also too wide for the depth-of-field I wanted as well (see how the leaves in the foreground aren't sharp compared to the gazebo and background?)
So I made some adjustments to my aperture and shutter speed and took this next image. I stopped down my aperture to give me more depth-of-field so everything would be in focus. I also sped up my shutter speed since it was so bright... but I overcompensated and made it too dark; now you can't see anything!
I adjusted one more time and nailed the shutter speed and the aperture to get what I wanted. The bottom exposure is "just right" - I have enough light to display the scene, but not too much to lose the details. Comparing the gazebo between the three shots helps you see how the correct exposure gives you all the details you want.
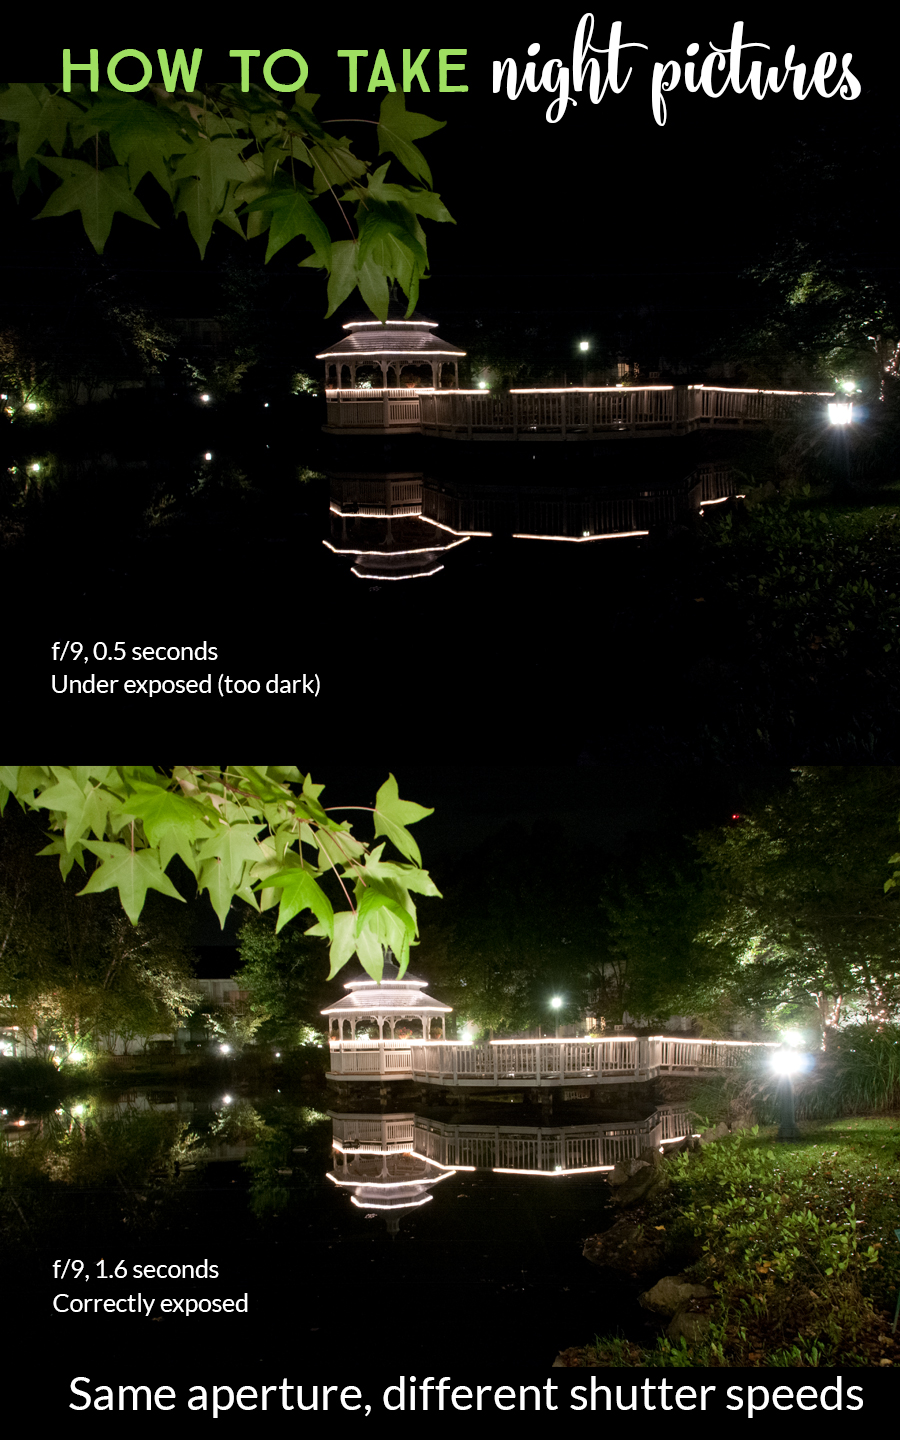
2. Playing with Shutter Speed To Get A Well Exposed Photograph
Here is a slightly different situation. The first one was way too dark, so I decided to let in a lot more light by opening up my aperture and extending my shutter speed. Then it was just a tad over-exposed. Sure, it was magical and dreamy, but there was no definition at all in the lights on the gazebo. I went down 1 click in my aperture, and two clicks in my shutter speed. Much better!
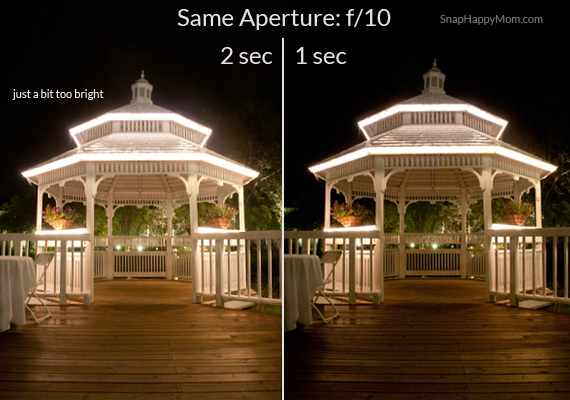
3. Changing Shutter Speed To Get the Right Exposure at Night
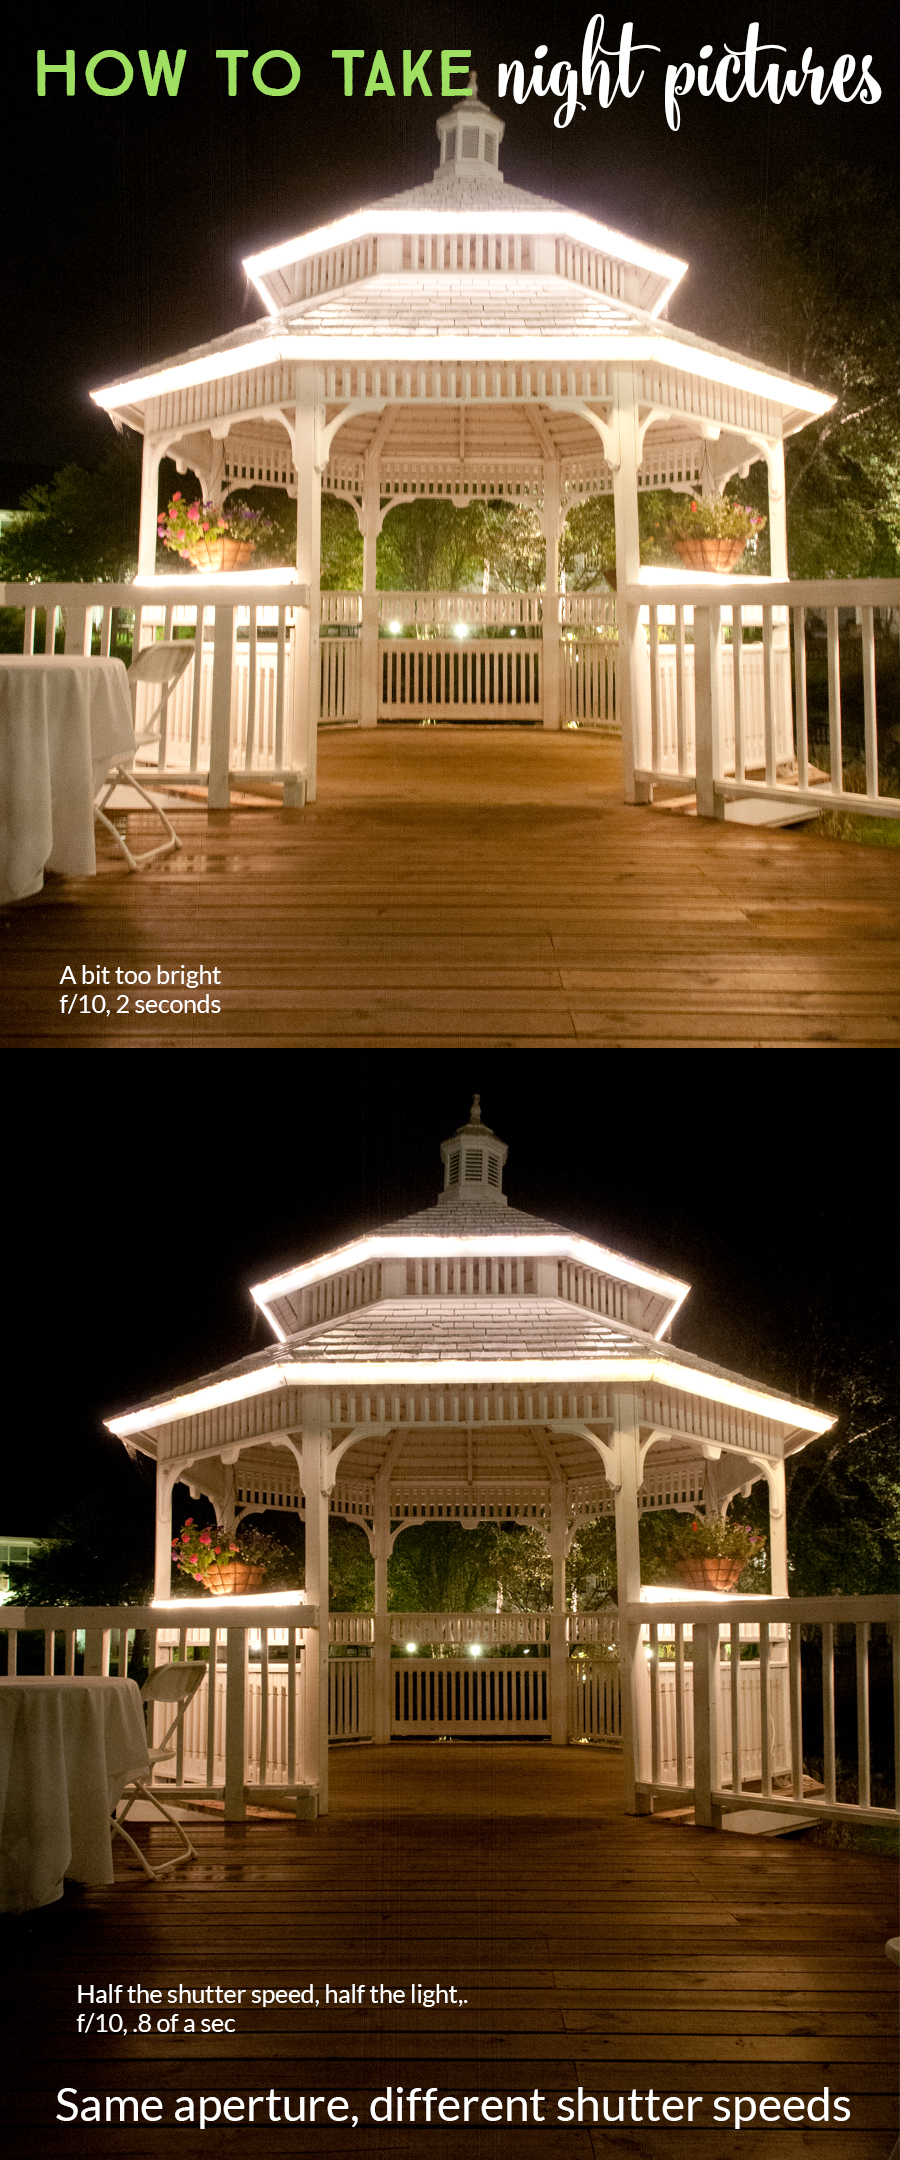
This is another example to show you the difference shutter speed can make. These shots had the exact same aperture, but the one on the top was too bright. I cut the shutter speed in half and got about half the light. That one change made just enough difference to not have the gazebo "glow" too much, which is what I wanted.
However, the one on the top is not technically wrong - maybe you want a dreamy, bright look. Go for it! There's no photo police! Do what looks good to you.
It was so fun to go out there and take these photos. Let me know if you have any questions in the comments below or over on my Facebook page, and I'd be happy to help! I hope you learned a lot about how to set up your camera to take pictures in the dark.
Pin this page for future reference!