
If you're not comfortable shooting all manual, then exposure compensation is your new best friend. It's a great first step to taking control over one part of your camera, especially if you're using automatic all the time.
The exposure compensation is a little button with a +/- on it, and it often works in combination with a dial you can spin.
First, though, we need to learn a bit about exposure so you understand how to manipulate it.
If you are using one of the automatic modes, like aperture priority or shutter priority, the camera is trying to expose the picture to look just right: not too bright and not too dark, but in the middle.
You choose the aperture or the shutter, and the camera chooses what it deems to be a matching shutter speed or aperture size to make the picture look middle-grey.
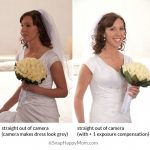
A good example of this is taking a picture of a bride in a white dress.
If the camera decides how to expose your picture, it is going to take everything that is white and shift it towards grey.
For example, in the two photos below, the one on the left shows how the camera judged the picture should look, and then on the right is a few frames later after I used the exposure compensation to make everything brighter.

See the difference it makes? Her dress actually looks white now!
This bride is standing against a snowy white background. In your head, you can recognize that this is going to be a pretty bright picture (white on light background). But the camera doesn't have a brain, so it sees all that white and thinks it might be overexposed, so it records everything in the picture a little darker.
The answer to this is to override the camera, using the exposure compensation function.
You can always shift the exposure while you're editing, but this is one of those things that it's nice to get it right in the first place.
Exposure compensation allows the camera to create whatever it deems the correct exposure and then forces that exposure brighter or darker in stops.
Exposure compensation actually moves in a fraction of a stop, usually in 1/3 increments. Also, those increments are rounded off, so there will usually be a .3, .7, 1 on the positive side, and a -.3, -.7, -1 on the negative side.
If you want your picture to be brighter, adjust your exposure compensation to the positive side (think of the plus sign, because you're adding light).
If you want your photo to be darker, adjust the exposure compensation to the negative side (think of the minus sign, because you are subtracting light).
You can use this in any situation where you are unhappy with how pictures are looking in your viewfinder. Using exposure compensation is one of the easiest steps to taking control of your photos.
You don't have to shoot in full manual yet, but this gives you a chance to cheat a little bit. Just don't forget to change it back to "0" when you're done!


Stephanie says
Good lesson. I didn't even know this. Keep the tips coming!
Also, what a beautiful bride that is!
Stacie says
Hahaha Stephanie. Too bad Meg didn't include a picture with the beautiful bride's gorgeous sister.
Elizabeth B says
Ooh! Good to know. I've been wondering how to fix the auto setting that made everything look kind of dingy. And I love that this doesn't require all manual settings. One day I'll get there. Baby steps 🙂
Meg says
Baby steps are EXACTLY the answer! This is actually one of the very first things I did to get off auto. You can do it!
Depending on your camera, it might not be an available option in full-auto, so try the P setting. P is for Program, and it works just like full auto with the bonus of being able to change your exposure compensation.
Manda says
Love this, thank you so much for the tip.