
If you're just trying to get some photos printed and done, Costco is a great option for convenient, quick, and seriously cheap printing with decent quality. However, the Auto-Correct features on the Costco website sometimes make your photos look worse because they can override your edits! You can vastly improve the quality of your printed photos by changing a few settings, including turning off the autocorrect function.
Auto-Correct on Costco Prints: Helpful or not?
Like most photo printers, Costco's computers default to certain settings, including an auto-correction feature. Auto-Correct uses an algorithm to enhance the color, brightness, and saturation of your photos, which helps people who upload their images straight from the camera.
However, if you have already edited or adjusted your photos, Auto-Correct actually OVERRIDES your changes.
You will get better prints from Costco if you turn off Auto-Correct for anything that has already been color-corrected or edited.
What looks "right" to the computer lighting-wise or white balance-wise should not take precedence over how you want your pictures to look. For instance, you might want a light & bright picture, but the algorithm might think the image is overexposed and try to make everything darker. If you've ever felt like your pictures are darker than they should be or more gray/blue/green than real life, it's probably because the printer is using an auto-correct feature that is overcompensating for something that was already edited.
This is especially true if you are printing images from a professional photographer - don't let anyone's printing software override the editing decisions your photographer already made!
But why is Auto-Correct on in the first place?
Auto-Correct is automatically on because it allows for Costco to make basic changes to photos that need them. Consider that many people do not edit their pictures before printing them, and this gives Costco the chance to fix glaring exposure errors and white balance issues, both problems that would reflect badly on their print quality if not fixed. For unedited images, the computer's enhancements are usually a good thing.
Here's how to get better prints from Costco!
1. Glossy vs. Lustre Prints at Costco
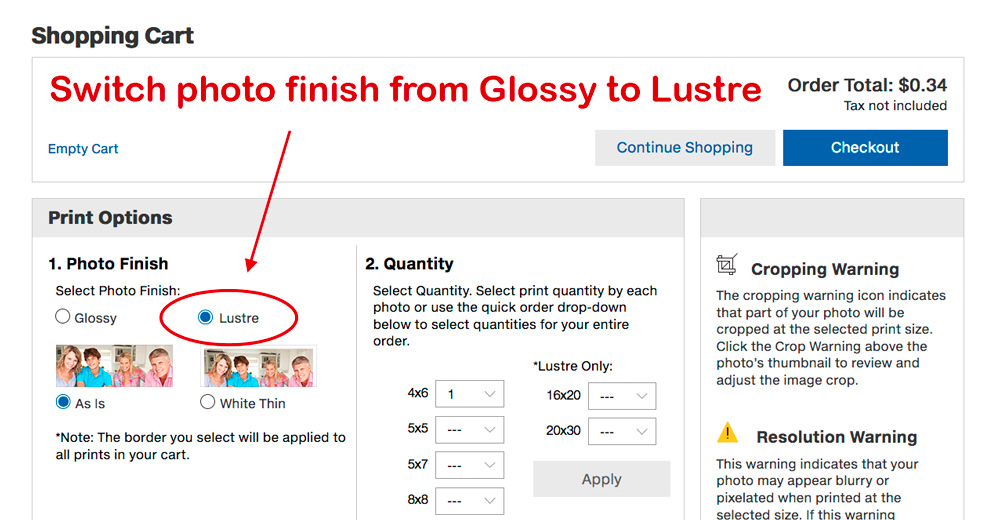
First, you're going to want to change your photo finish to Lustre. We'll get to Auto-Correct later in the order process!
This is one way to get a higher quality photo print from Costco. The Lustre photo finish is a matte finish that definitely adds to the professionalism of the print. The glossy finish will attract fingerprints and that's never good!
Once you've uploaded your prints, you'll get to your Shopping Cart page. You have to change the photo finish of the entire order all at once (so if you want a combination of glossy and lustre you have to place multiple orders).
Toggle the Photo Finish to Lustre with the radio button, and then decide your desired sizes and quantity. Click Checkout on the bottom of this page.
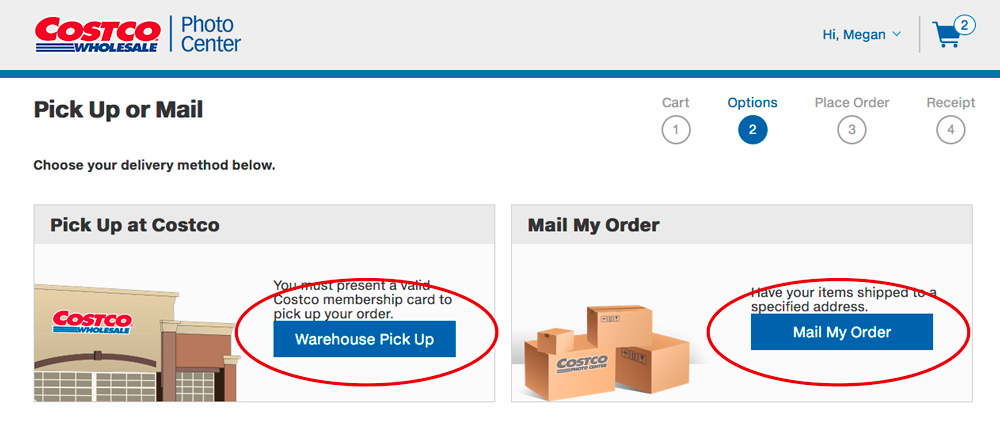
The next screen is just your decision where to print, so do whatever you normally do.
2. How to turn off Auto-Correct on a single order:
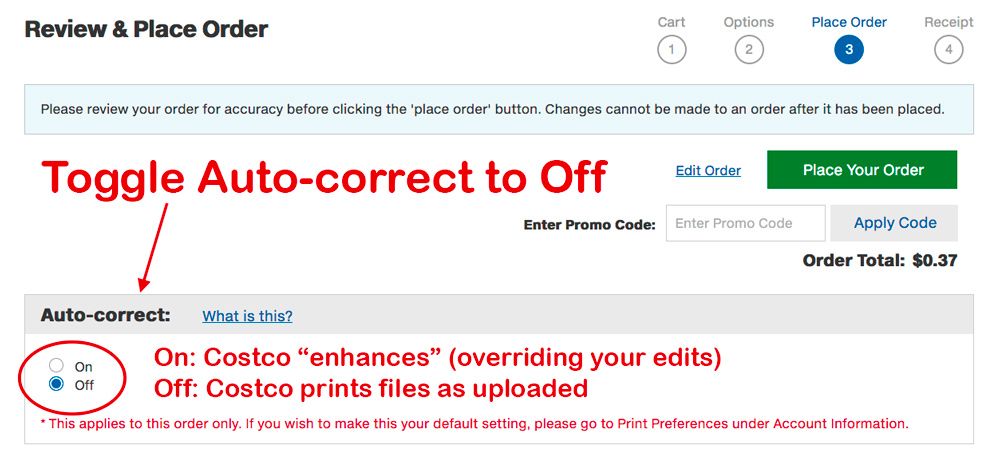
At this point, you'll be on Costco's Review & Place Order screen. The next thing you want to do is turn off the Auto-Correct on the order.
The top of this page has the Auto-Correct options. Click the radio button to toggle between On and Off.
Remember, Auto-Correct "On" means Costco will enhance your pictures, overriding your edits. Auto-Correct "Off" means your files will be printed as uploaded.
Once your order is placed, you can confirm that it worked on your receipt/the Thank You page.
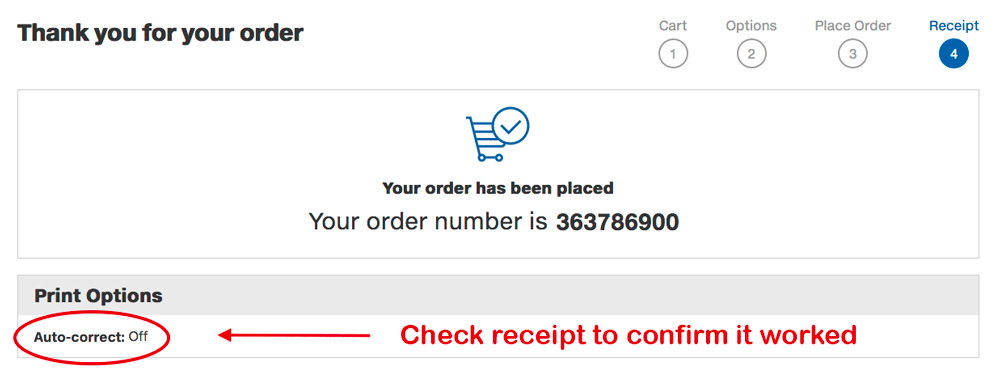
Ta-da! You've just instantly improved the quality of your Costco prints with only two changes!
How To Turn Off Auto-Correct Forever
The above directions are how to remove Auto-Correct one time, on a per-order basis. If you routinely edit your photos before uploading them, don't you think it would be nice to have your account set up to always print that way? Well, guess what... you can!
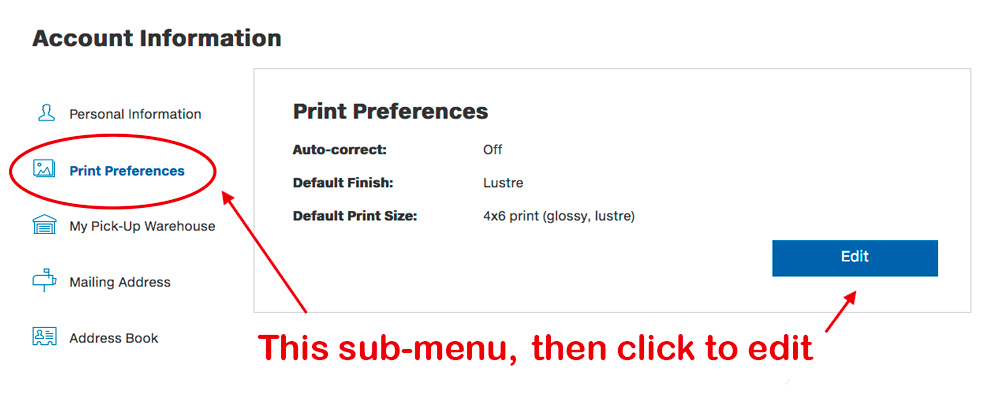
Mouseover the "Hi, User" link on the top right to click on the dropdown option that says "My Account." This brings you to the Account Information page.
Click the second option in the left column, which is called Print Preferences. This will bring up your current default settings in the right column, then choose the blue button on the bottom right that says "Edit."
Here's where you change your default print settings. Obviously, any of these can be changed on a per-order basis, but if you're in a hurry, it's so nice to have everything set up the way you want it to work.
These are the preferences I use:
- Default print size: I keep my prints at 4x6 (don't worry about the glossy/lustre mention, it just means both are options)
- Switch default finish to "Lustre" (glossy just attracts fingerprints!)
- Turn Auto-Correct to "Off" (Remember, Auto-Correct enhances the color, brightness, and saturation of your photos. If you use printer profiles or have already adjusted your photos using an image editing program, Auto-Correct should be turned off.)
- (There is no longer an option for back text printing - Costco retired this option)
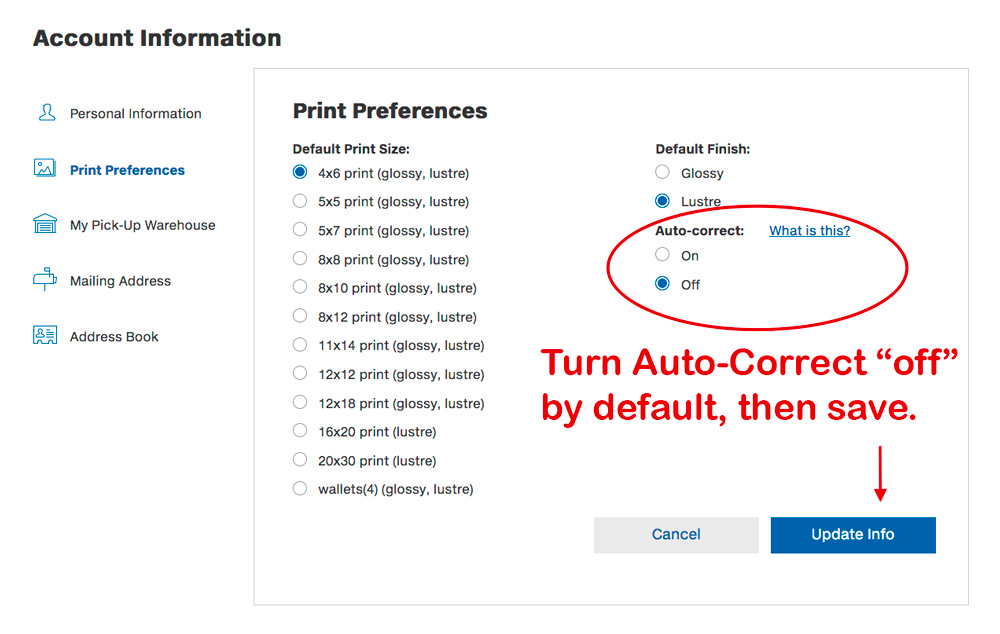
Save by clicking Update Info, and you're done. Now, every future order will have those options activated unless you change them individually.
Hoorah! Your prints will all look better now. You might not notice a difference in photo quality every time, since it really depends on the picture, but rest assured that all your hard editing work isn't getting thrown out by a computer just doing its job. Congratulations!
Pin to remember for later:
Stacie says
I didn't know Costco did that; good to know. Thanks!
Jean-Jacques Simard says
Thank you very much for all the information about auto-correction ON or OFF and the possibility of taking advantage of personal choices as for printing by clicking the right boxes in our account.
Marci Wallace says
I wish I had read this article a week ago! I created custom baby shower invitations and kept sending them to Costco to print but they were coming out not at all how they looked in photoshop! They were so dark and not at all colorful & bright! The first Costco worker told me to just brighten the image which did not work and when I test printed the second time, that employee had no idea then finally the third test print the Costco guy told me "oh, just turn off autocorrect! it'll definitely fix your problem!" AHH. Then I couldn't figure out how to do it so thanks for this post! So hoping when I pick them up tomorrow they are perfect and can finally be sent out! xoxo
Rachel Dornik says
GREAT resource for my clients! Thank you! This is a hard process to explain without pictures! Your post will be sent to many future printers! Thank you!!
Tomas Jones says
If you want to get even better results, from Costco, there is a great website that lists the print machines at each Costco store! You can download the color profile of that machine and use it - providing you using something like Adobe Lightroom - which allows you to use specific profiles. Check it out Dry Creek Photo:
http://www.drycreekphoto.com/
Click the 'Database' link, to provide list of locations. The site is also a wealth of information about calibrating your system.
Angela Santos says
How about if you are trying to print a photo book
Jenn says
Thank you so much for this info!! I just printed off 300 vacation photos at Costco and was NOT please with how dark they are. I made your suggested changes and reordered a few to see how they compare. Thanks so much!
Meg says
I hope they turn out - they should definitely be better! If they still aren't up to par, then I suggest asking the photo department for help - every time I've had a problem they've know just what to fix to get things back to normal.
Aaron says
This is hugely helpful, thanks so much! I didn't know I could change my default preferences. I'll never have to worry about remembering to uncheck the auto-correct button again!
One more tip for anybody else finding this page: if you're having trouble with your order (say for example you forgot to uncheck auto-correct before submitting), it's MUCH faster to call your local Costco and choose the extension for the photo department, rather than calling the Costco Photo 800 number. After a 10 minute phone call (including 2 minutes of trying to tell her my email address and 6 minutes of sitting on hold, and 1 minute of writing down my ticket number), she was unable to offer any assistance other than telling me to call my local Costco and request they cancel the order.
gb says
My photographer instructed me to turn the auto-correct off when printing at Costco, but I had no idea how to do it. Thank you for the fantastic tutorial! I appreciate it!
rocio says
awesome info, thank you for sharing!! Also, do costco photo prints have a white/blank backing? I prefer not to have the logo or other type in the back, and was wondering about that... Let me know if you can, thank you!
Meg says
Costco prints on Fuji paper, which is branded. I can't think of any company that has a plain white background for regular 4x6 prints - the companies that supply the paper purposely only have branded paper.
However, something like Chatbooks that prints on their own paper stock do have blank, white backgrounds.
j says
I just printed a 5x7 photo at a self-service kiosk at a local FedexOffice store using their newer Sony PictureStation, and the back of the photo was completely blank white, with no logos. The photo looked great, but it was also very expensive relative to Costco.
Sandra Meinholz says
Does Costco give you the option to print the date the picture was taken on the back?
Meg says
Not really. Costco doesn't actually know when the picture was taken! That metadata isn't uploaded into their system. Technically they know when it was uploaded, but that's not very helpful either.
If you batch process photos, you could add a date range yourself (like December 2016 or something). That option is in the Edit window of Print Options, where there is a "image number and custom text" radio button. The only thing would be that it would have to be correct for the entirety of the batch you're ordering, since you only get to add one custom snippet of text across the board.
The other option would be for you to manually put the date in the image name before you upload, and then click the radio button that uses the image name on the back. This would allow you to print different dates in the same batch, but it would mean you had to label everything before you uploaded.
Hope that helps!
Jamie Alvine says
For the past two years when printing cards for Christmas using greeting cards I have been unable to find anywhere to turn off automatic editing. Can you update your post or tell me where I can find that option now? Thanks!
Meg says
When you do greeting cards, the picture shouldn't autocorrect at all, unless you mess with the photo settings as you put it in the card template. I don't believe there is any other option, but I will ask my contact at Costco!
Lise says
I am soooo glad to hear that! I ordered Holiday cards through them and since I had such a fiasco with auto correct on my prints, I thought for sure it would be that way on my Holiday cards. I am crossing my fingers that they DO NOT auto correct my cards and anxiously awaiting the results of them.... Merry Christmas again!
Lise says
You just saved my bacon! I could not figure out how to turn off the auto correct. I ordered 5X7's, 4x6's and wallets all on the same order and when I went to pick up my photos, the wallets were the only ones that were not auto corrected. When I asked the girl behind the counter why my bigger photos did not look right but my wallets looked great, she said it was because I had auto correct on for the larger sizes. I DO NOT know how they differentiate between the sizes since all photos were on the same order. The girl did not know how to help me, so I had to reorder my larger prints AGAIN (crop etc) and it STILL auto corrected that order. Then I found your site. I went to my previous orders, reordered the ones that were yet again put on auto correct and adjusted the edit of auto correct. (why is the button so small and hidden???) I permanently changed it on my Costco account too. Thank you so much for this tutorial. Their photo website does not even have this type of auto correct tutorial. I really appreciate it and Merry Christmas!
Lise says
I sure wish the Costco photo people were as photo savvy as you are!
Terese says
Thank you so much for this information! I've been frustrated in the past when I picked up pictures only to find that the editing I had spent so much time on was overwritten! But not so this time, thanks to the info you posted! I've looked at looked for how to turn off this option, but to no avail because didn't realize it is selected toward the very end. Would have been more logical to place this option where you also choose between glossy and luster. Oh well, now I know. Thank you so much!
AJ says
Is there ever a time when auto-correct would be beneficial? Say, if you are not a professional and do not edit your photos beforehand. Thanks!
Meg says
AJ, good question. If you don't edit you're photos at all, then autocorrect will likely provide a better outcome for you, since it will analyze the photo and try to brighten/darken/saturate accordingly. However, it's just so unpredictable - especially with white balance or pictures that intentionally have lots of black or lots of white. In general, I stand by the idea that "you are smarter than your camera" (or in this case, the computer that's making those decisions). So, just recognize that it might overcorrect things you thought were fine in the first place. You can always ask to have them reprinted if you don't like them, either way!
Mia says
Do you know if when using the Costco app to send files to print to my local store, if it automatically autocorrects. I get no options to turn it on or off. I’m guessing it just automatically autocorrects thru the app because they come out really dark. I guess I should do it though the website.
Deborah says
Thank you! You helped me do my first Costco photo order right!
Kay says
Well Meg - this is great. So nice to find the 'tip'. I have a question about whether Costco printing respects the 'cropping' that I have done? My sister tried to have a picture printed (that I had edited/cropped) & it came out not cropped. Do you know anything about this?
Meg says
Hmm. Usually Costco just prints what is uploaded to their system. Perhaps she accidentally uploaded the uncropped version? When you say you edited/cropped it, what program were you using to do that?
Caroline says
I just made some prints on Costco and got a message saying the photos would be cropped to fit the 4x6 size. It gave me the option to see the crop lines, so I could move that box to control where it cropped (and then hit Apply).